Design Suite Tools is a streamlined platform offering essential creative utilities and digital design resources to help users efficiently create, edit, and optimize visual content for professional and personal projects.
Looking for the best Adobe discount in 2026? You’re not alone. Adobe Creative Cloud is one of the most powerful design suites in the world, but it can be expensive if you don’t know where to look.
The good news? There are completely legal ways to save money — including official deals, student discounts, and cashback opportunities.
💰 Current Adobe Deals (Updated 2026)
Adobe offers several pricing options depending on your needs:
Individual Plan: Full Creative Cloud access
Photography Plan: Photoshop + Lightroom bundle
Student Plan: Up to 60–65% off
👉 Tip: Students and teachers get the biggest discounts.
🔥 How to Get the Lowest Price on Adobe
Here are the 3 best ways to reduce your cost:
1. Use Official Adobe Discounts
Adobe regularly runs seasonal promotions. These are the safest and most reliable deals.
2. Apply Student or Teacher Discounts
If you qualify, this is the biggest saving available. You can reduce the price dramatically compared to standard plans.
3. Use Cashback Platforms
Some cashback platforms like TopCashback allow you to earn money back after purchasing Adobe.
Instead of paying full price, you get a percentage returned — which effectively lowers your cost.
⚖️ Is Adobe Worth It in 2026?
Pros:
Industry-standard tools
Powerful features for professionals
Regular updates and cloud integration
Cons:
Subscription-based pricing
Can be expensive without discounts
👉 Verdict: If you use it regularly, it’s absolutely worth it — especially when you stack discounts and cashback.
❓ Frequently Asked Questions
Can I cancel Adobe anytime? Yes, but some plans may include early cancellation fees.
Is there a free version of Adobe? Adobe offers free trials, but full features require a subscription.
What is the cheapest way to get Adobe? The best method is combining student discounts with cashback offers.
✅ Final Thoughts
If you’re planning to use Adobe in 2026, don’t pay full price.
Take advantage of available discounts and cashback options to save significantly — legally and safely.
👉 Check the latest Adobe deals before purchasing to make sure you get the best price available.
Nonetheless, Wilkes recalls one specific sea lion who seemed especially interested in what was going on in Wilkes’ temporary home.
“He was very curious about me,” Wilkes laughs. “He couldn’t really identify me or smell me, but he was curious.”
Wilkes emphasizes that he is not a timelapse photographer. Not that he knocks the craft by any stretch, but he says it implies a sort of automation of the photographic process. Instead, he intentionally captures every single shot.
“I’m reacting to what I’m seeing — take a picture. Every moment that you see is something that I’m actually focusing on at a given moment in time. My eye basically moves from left to as time changes,” Wilkes says. “So in the morning, my eye was focused early in the morning on this relationship, these things that were happening here, things that were happening in the foreground, all of that was part of my focus. As time changes, my focus begins to change. I move my eye towards what I call the vector of time.”
He likens his process to those he has used throughout his career as a documentary and sports photographer. While his Day to Night project, started in 2009, is arguably his most famous, he has been a professional photographer since 1983, earning acclaim for fine art, editorial, and commercial work.
‘Every moment that you see is something that I’m actually focusing on at a given moment in time. My eye basically moves from left to right as time changes’
One thing that has been common throughout his career, albeit manifested differently for Day to Night, is Wilkes’ deep obsession with his craft and subjects. Wilkes calls focusing on a single scene for two straight days a meditative experience.
“[It’s] a physical visual meditation of me staring at a place over the course of 24 to 48 hours [and] gives my work a certain depth,” Wilkes says. “And also you can see the moments I’m capturing are, in a way, they’re kind of magical… I think what I try to do is I’m trying to communicate the visual language that these animals and these wildlife were sharing with me. I’m becoming a part of that language in a way, and that’s what I’m trying to share. It’s been a really enlightening experience being able to do these pictures.”
Successfully achieving that feat does not come easily. Wilkes believes much of his success relies on the energy he brings and puts out into the world.
“What I project into the scene, that’s something a lot of people don’t really understand or talk about enough, the way you are and what you put out in terms of your energy,” Wilkes says. “If you create fear — you hear stories about this all time, animals have a certain instinct to smell fear and having that kind of energy, when you project that, the animals sense that.”
‘It’s been a really enlightening experience being able to do these pictures’
In contrast, Wilkes tries to always be positive and respectful, which he believes the animals can sense, and this makes them feel more comfortable with his presence.
“It’s a great gift to be able to witness” the animals going about their lives, the photographer remarks. Wilkes thinks that being out in the field for so long, focused on his work and nothing else, is a privilege. It’s a challenge, too, of course.
“It’s an unbelievably powerful way to reconnect to the world and be present. I think that’s one of the great joys of being able to migrate [Day to Night] to shooting wildlife. I feel like, in a way, it’s given my work a deeper purpose,” Wilkes says. “I think once you create art with purpose, it’s very hard to create art that doesn’t have purpose. This is what I love to do.”
A Very Different Energy in Botswana
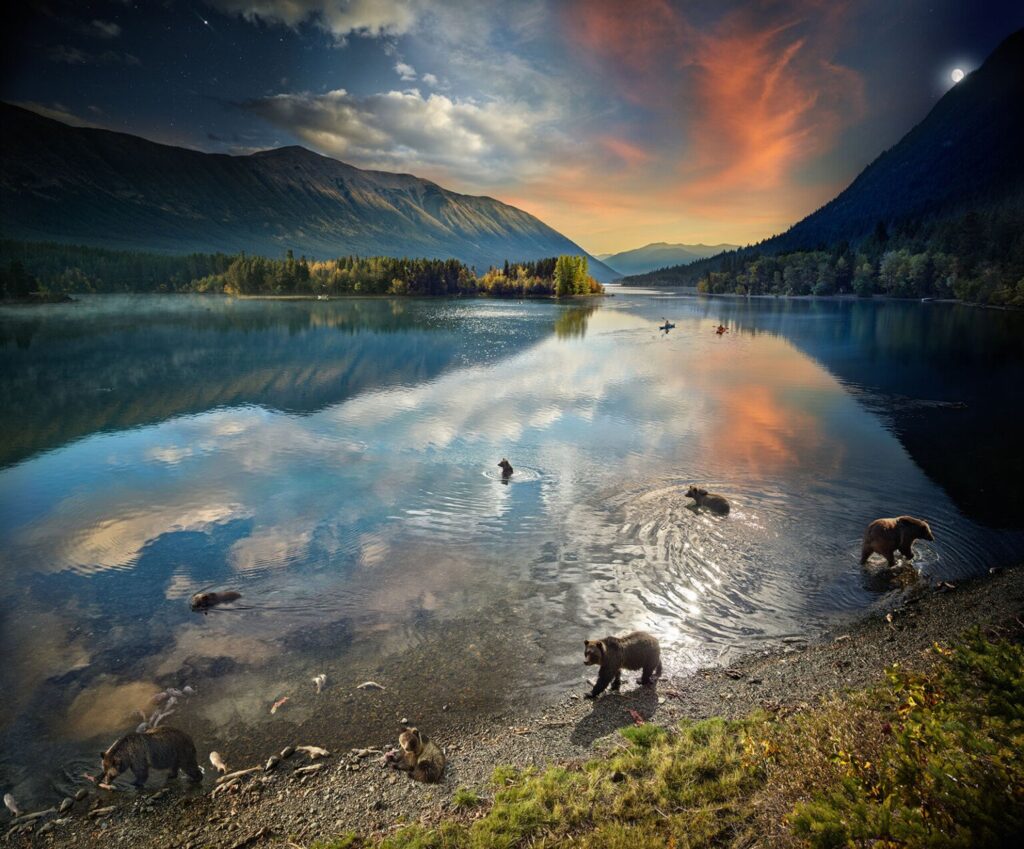
When Wilkes photographed a different watering hole in Serengeti National Park in Tanzania, he witnessed a vastly different scene than he did in Botswana in the Okavango Delta.
“They feed together, they stay together,” Wilkes says of many of the African wildlife, particularly the ones that are often prey for apex predators like lions. “They stay together [because] the likelihood you’ll both be attacked by a predator goes down substantially. That’s what I witnessed when I photographed my Serengeti image over the course of 26 hours.”
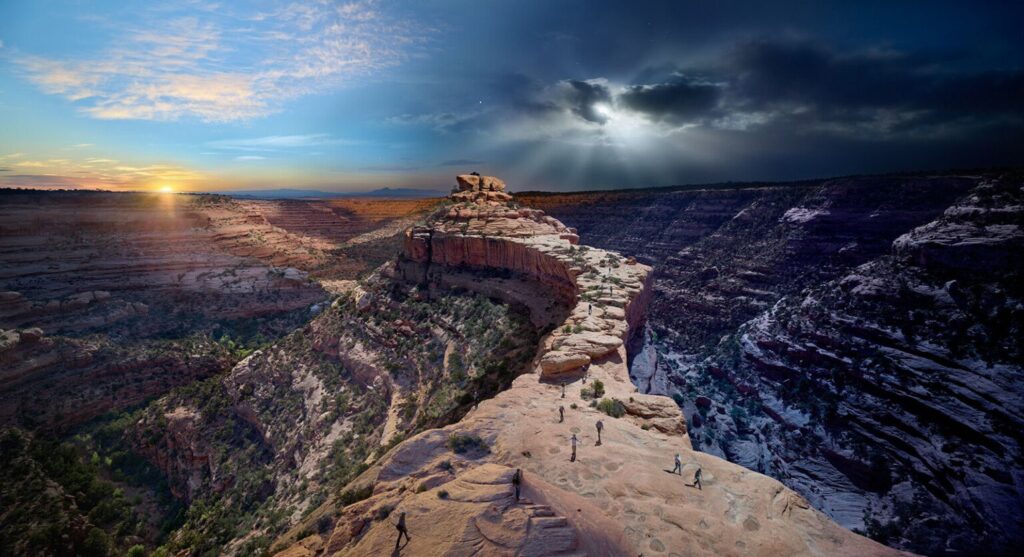
“But here I was photographing for 18 hours,” Wilkes says of Botswana. “And it was not a five-week drought like it was during the Serengeti photograph it was now a five-month drought. What I witnessed here was that the animals have changed their behavior. They’re not sharing water anymore, it’s totally abut survival of the fittest. The scarcity I witnessed firsthand, a sort of uncontrollable chaos over the course of the 18 hours I photographed and watched [was different].”
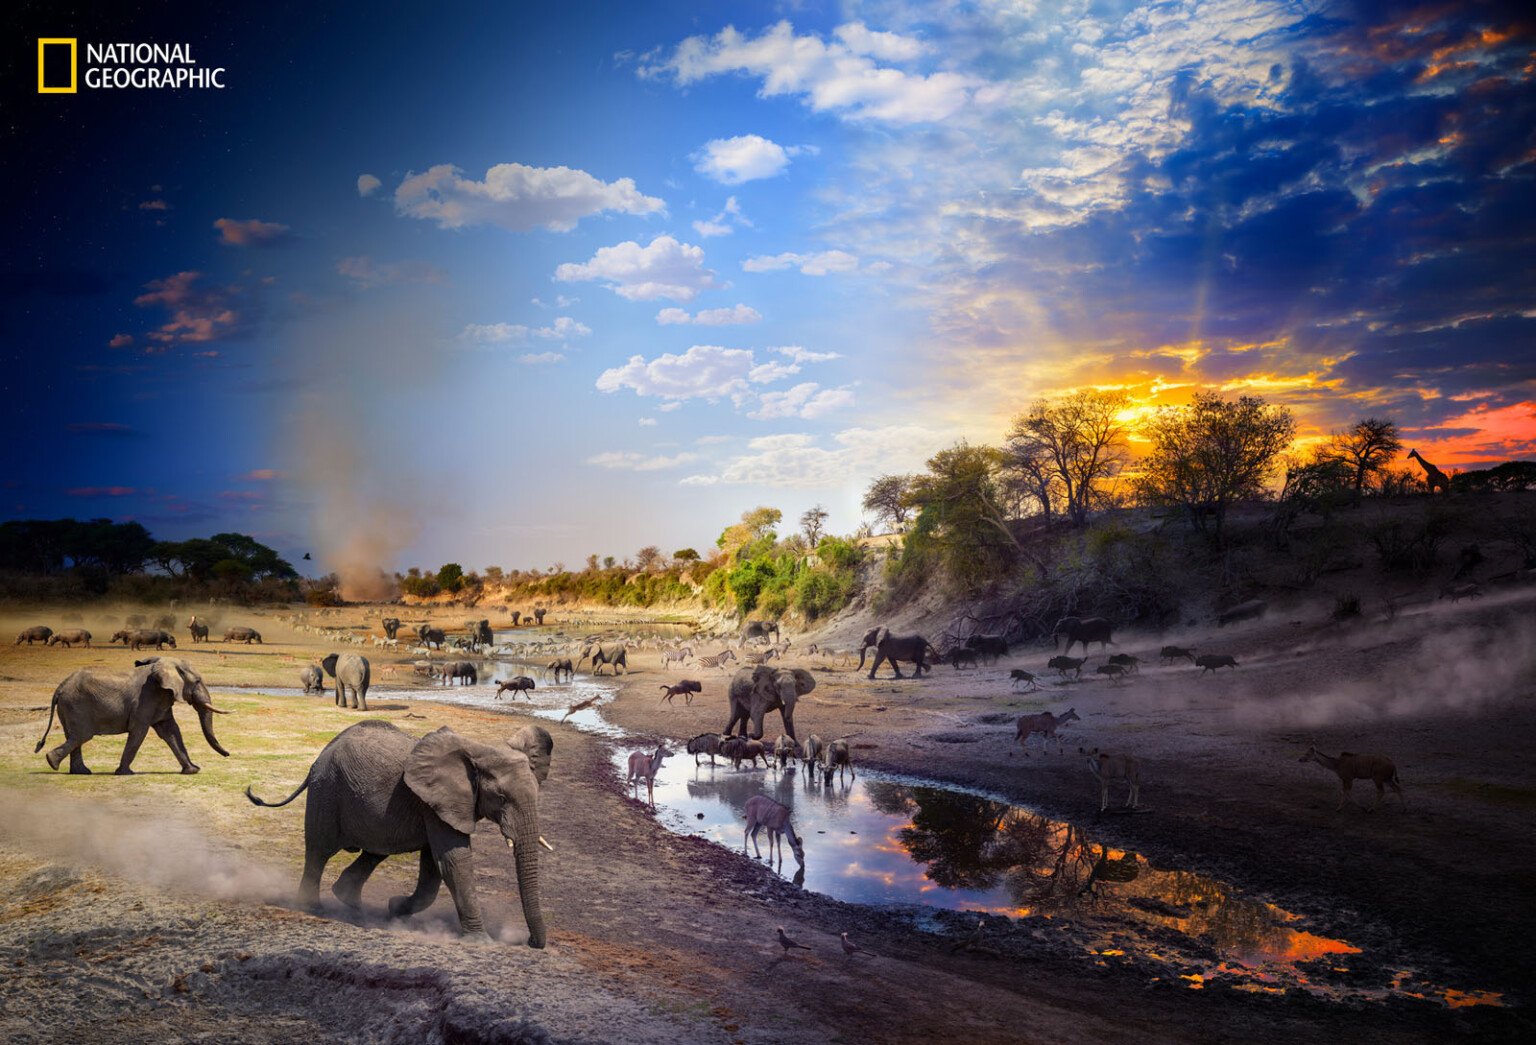
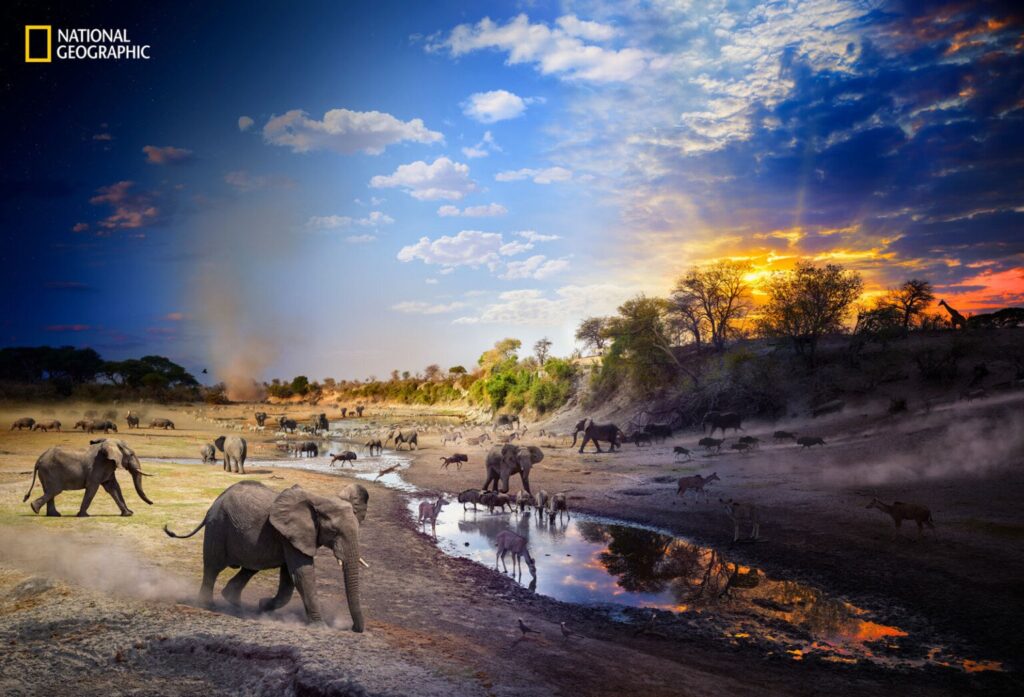
‘Over the course of one action-packed day, photographer Stephen Wilkes watched animals charge toward a meager water hole at the height of extreme drought in Botswana’s Okavango Delta. Elephants flared their ears. The legs of antelope and zebras splayed in a mad dash. One hippo dipped its head to charge an elephant calf, while another opened its mighty mouth in an intimidating display. Wilkes applied his signature Day to Night technique, in which he takes as many as 1,500 pictures from one vantage point over the course of 18 to 36 hours, seamlessly layering the 50 or so best moments to create a final image.’
Wilkes points to different areas of the photograph that capture this new animosity and tension at the watering hole. Wildebeests are being terrorized by an elephant in one area, while another shows a hippo staring down an elephant, nearly daring it to come any closer.
“That was a moment I’ll never forget. I could feel this hippo look at a young elephant and say, ‘Don’t even think about drinking my water.’ You could feel his energy,” Wilkes says. “I realized that the water had changed the entire vibe, the dynamic. The chaos I was watching was all about water.”
Or really, the lack of water. These animals need to drink, and their food requires water to survive and grow. As Wilkes says, nature is so often about balance, and when the balance shifts or gets out of whack, like during a drought, everything changes.
At one point early in his day in Botswana, positioned in an elevated blind 15 to 20 feet in the air, a young elephant took notice of Wilkes and the truck.
‘The chaos I was watching was all about water’
“He’s staring me down,” Wilkes says. “These animals are so smart, they have so much energy. The way they project, when they look at you and lock eyes, you know you’re in the presence of a high intelligence.”
That’s part of what makes elephants so special, but it’s also part of what makes them potentially dangerous. This elephant was fixated on Wilkes and postured aggressively for about 45 minutes. Wilkes says the guide, who was in the truck itself, was convinced the elephant was going to charge. He was showing all the signs.
“My assistant and I were basically hyperventilating. We’re so scared, but we’re trying to show love and calmness and everything,” Wilkes says, able to chuckle about the event now. If the elephant had charged, it would have spelled trouble. The truck, which was partially jacked up to support the elevated blind, was unable to escape. The elephant, while young, had plenty of size and strength to topple the entire thing over.
Ultimately, a much older, massive female elephant came through and trumpeted louder than Wilkes had ever heard before, and rammed the young elephant. After that moment, no other elephant hardly looked at Wilkes.
“This male just walked away, and nobody came near me the rest of the day,” Wilkes says. It felt like somebody was looking down on me because the thought of being charged when you’re up in a truck 15 feet in the air is not a very reassuring feeling.”
‘My assistant and I were basically hyperventilating. We’re so scared, but we’re trying to show love and calmness and everything.’
“But it was all worth the effort to make this picture,” Wilkes says. “Sometimes the natural world helps you out. I was very lucky.”
The animals in the picture, which include 10 different species, were unfortunately not so lucky, all struggling to survive through a particularly horrible drought.
“This picture is canary in the coal mind,” he says, alluding to how a changing climate and inadequate resource management have far-reaching impacts. While the rebounding Stellar sea lions in British Columbia serve as a positive indicator species, showing that environmental protections are working and the habitat is improving, returning to a natural balance, the drought in Botswana reflects what can happen when nature is out of balance.
Wilkes rightly believes that he has a responsibility to bring these important stories to a broader audience. Photography is a powerful tool for effecting change, and Wilkes’ images are an especially robust means of visual storytelling. They quite literally tell the story of a day or more in a single frame, condensing all these moments and interactions into one shot.
“That’s how you begin to move the needle, through inspiring. Sometimes it’s one person at a time, but you just got to keep doing it,” Wilkes says.
“There’s this power of the individual that we can all make a difference by just doing something,” Wilkes continues, citing the late, great Jane Goodall. “And once you learn how to do one thing, you realize it wasn’t that hard. And you can do something else. Suddenly, it grows. That’s how we forge change. And I think that’s what must happen here, we have to collectively recognize what’s happening globally with our climate and figure out how to protect species.”
Wilkes, a grandfather now, wants to be able to take his grandchildren to see the places he’s photographed, and he desperately hopes the environments are healthier than they are today.
“I don’t want the only history of wildlife they see to be these photographs,” Wilkes says.
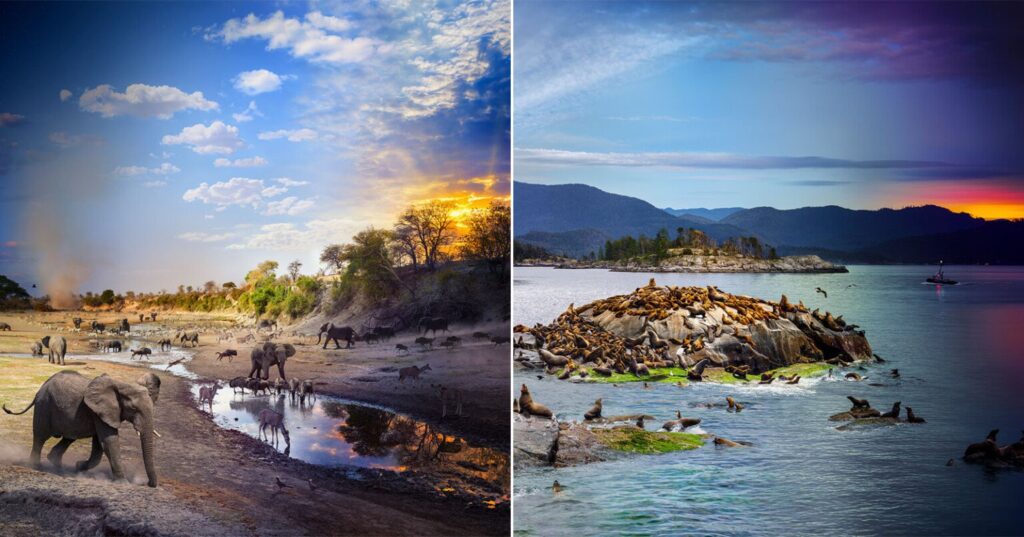
Award-winning photographer Stephen Wilkes has two photos in this year’s National Geographic Pictures of the Year, a celebration of 25 of the best and most important photos featured in this year’s issues of National Geographic. The photos, Wilkes’ famous Day to Night images, add a new layer — time — to beautiful wildlife scenes.
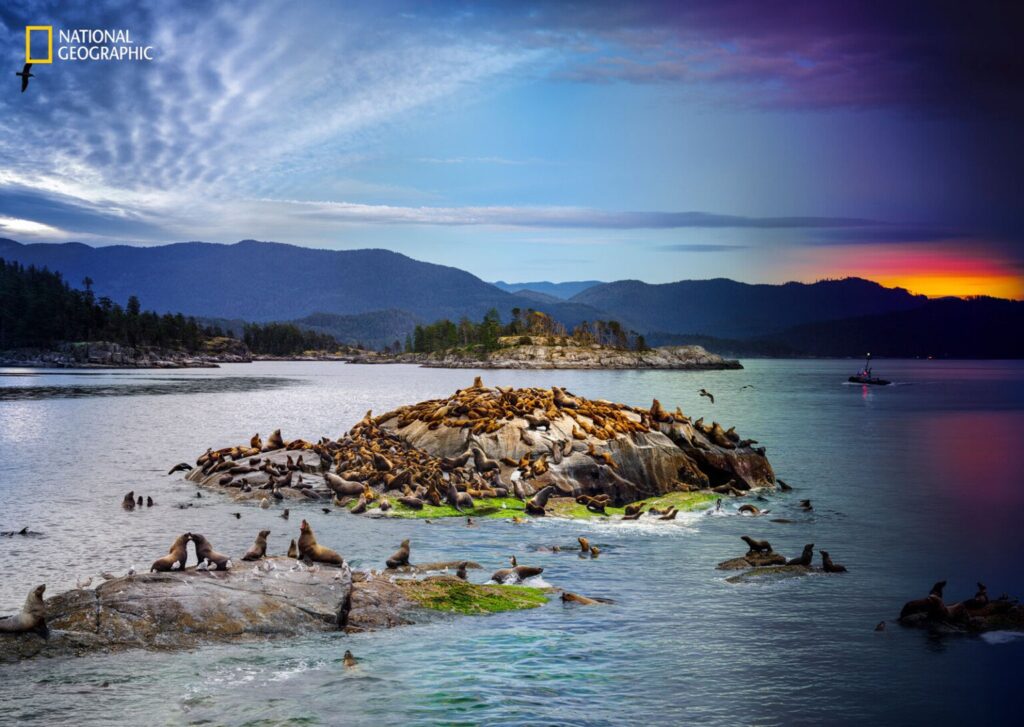
Wilkes’ two featured photos each show wildlife, albeit in very different ways and in vastly different climates. One features a Steller sea lion rookery in the Malaspina Strait in British Columbia, Canada, while the other shows a drought-ravaged water hole in Botswana’s Okavango Delta. The Steller sea lions, thanks in large part to significantly stronger protections from the Canadian government, are a recovering population. The antelope, hippos, elephants, and more in Botswana were struggling after a five-month drought, competing for every last drop of water, when they would have otherwise peacefully coexisted.
While Wilkes has long kept the secrets of his post-processing close to his vest, as part of Pictures of the Year 2025, the photographer has provided a never-before-seen look at how he and his talented team take his photos, captured over many hours, sometimes days, and create the final temporal composite.
“It’s always driven by narrative,” Wilkes says of the final decisions made about which precise moments to keep and which to leave out in the final photos. He says there are times when he is in the field, captures a shot, and just knows, “that has to be in the picture.”
And Wilkes is in the field a lot to create these photos. For the Steller sea lion shot, he was in a blind on a rock out on the water for nearly 50 hours, getting about “one hour” of sleep during the entire time. In Botswana, he was in a blind at the top of a jack mounted to a pickup truck, nearly 20 feet off the ground, for 18 hours, mostly in 105° F heat.
Not only does Wilkes need to be out there so long, constantly watching and shooting, to get the best final image, but he also argues that it’s essential to fully experience the ebb and flow of time in a space, to really get to know the animals and the place they call home.
A Stellar Photo of Steller Sea Lions
“It’s an amazing thing to witness over the course of time,” Wilkes tells PetaPixel of the Steller sea lions. “The males are the dominant species, and when they’re breeding, the whole idea is whoever is at the highest point physically on that rock becomes the dominant male. It’s like a game of king of the hill.”
Over the two days Wilkes was there, he witnessed males fight their way to the top, run out of energy, and then get bested again and again. After toppling the competition, the male stands as high as they can. These statuesque victors are seen throughout Wilkes’ photo. Each major rock area has its own king, albeit a temporary one.
Meanwhile, as the males are fighting over rocks, the females are often out hunting and gathering food for the young, who chase each other on the rocks and in the water.
‘Stellar sea lions stretch their necks skyward in the Malaspina Strait of British Columbia, Canada, where the once dwindling population is bouncing back thanks to federal protections. Photographer Stephen Wilkes watched the rhythms of daily sea lion life play out — along with a 14-foot tidal change –blending dozens of shots into a single image.’
All the while, as these different, interconnected relationships play out on what is ultimately a fairly small rock outcropping in the water, the tide is rising by a couple of feet per hour, which Wilkes describes as “dramatic.” It was also a challenge he had to overcome when shooting and creating the final shot: the action and sea lions were captured at all hours and at different tides, yet the final frame has a unified sea level, which is ultimately near its low tide position.
This challenge was “one of the things that was really exciting for me,” the photographer explains. “How do I manage capturing this, not only the transition of time and light and behavior, but also how do I show the dramatic changes this island takes over the course of 24 hours?”
Wilkes points out the green mossy area on the rock, which, when visible at low tide, “changed” the behavior of the sea lions.
“It was so rich and green and alive. It was spectacular. It was almost like a play land for the children,” Wilkes says, citing this experience as one of the standouts of his time in the field.
In the final shot, a group of pups chases each other through the scene, like a game of “follow the leader.”
“This is one of my favorite moments,” Wilkes says. “There’s this joyful celebratory aspect to these animals. When you study them for the course of 48 hours like I did, you begin to really see the individual personalities of these Steller sea lions.”
To ensure the sea lions felt safe and comfortable, Wilkes and his team carefully set up their blind so that a rock wall was behind it, facing the prevailing wind. This meant that the wind didn’t hit the blind and carry Wilkes’ scent toward the rookery rock. Sea lions rely heavily on their olfactory senses, so it made a huge difference that they couldn’t smell the photographer. He believes he is the first person to be allowed on these islands, at least since the Canadian government began protecting the Steller sea lion habitat, so it was essential to make as small an impact on the environment and animals as possible.
Blender is a free, open-source 3D software that has become one of the most powerful tools for 3D modeling, animation, and rendering. From game assets to product visualization and even films, Blender is used by professionals and hobbyists alike. This beginner’s guide introduces the basics of Blender for 3D design.
1. Why Use Blender?
Free & Open Source – No cost, with a strong community of developers.
All-in-One – Supports modeling, sculpting, animation, rendering, and video editing.
Industry Adoption – Used in indie films, game studios, and design agencies.
Cross-Platform – Available on Windows, macOS, and Linux.
Constant Updates – Frequent improvements and new features.
2. The Blender Interface
3D Viewport – Main area to model and manipulate objects.
Outliner – Organizes all objects in the scene.
Properties Panel – Adjusts materials, modifiers, and settings.
Timeline – For animation and keyframe editing.
Toolbar – Contains selection, transform, and modeling tools.
3. Key Concepts for Beginners
Meshes – Basic objects (cube, sphere, cylinder) used for modeling.
Vertices, Edges, Faces – The building blocks of 3D models.
Modifiers – Non-destructive edits like subdivision or mirror.
Add Objects – Shift + A to insert cubes, spheres, or other primitives.
Edit Mode – Tab key to switch between Object Mode and Edit Mode.
Modeling – Move, extrude, and scale to shape your design.
Apply Materials – Use the Properties Panel to add colors and textures.
Lighting & Camera – Place lights and adjust the camera angle.
Render – Press F12 to generate an image of your scene.
5. Tips for Beginners
Learn navigation: middle mouse button to rotate, Shift + middle button to pan, scroll to zoom.
Use mirror modifier for symmetrical models.
Save often—Blender projects can get complex.
Start with simple models (e.g., a coffee cup) before moving to advanced projects.
6. Advanced Features to Explore
Sculpting – Create organic models like characters.
Animation – Add keyframes for movement and effects.
Grease Pencil – 2D animation inside a 3D environment.
Cycles & Eevee Render Engines – Realistic vs. real-time rendering.
Add-ons – Extend Blender with free or paid plugins.
Conclusion
Blender is a powerful, versatile tool for 3D design that rivals paid software. By mastering the basics of modeling, materials, and rendering, beginners can quickly bring their 3D ideas to life. With dedication and practice, Blender opens the door to animation, game design, and professional 3D art—all for free.
Procreate has become one of the most popular apps for digital artists, especially those who use iPads. Known for its intuitive interface, realistic brushes, and powerful features, it offers a portable yet professional solution for illustration and painting. This guide introduces beginners to Procreate and how to get started with digital art.
1. Why Use Procreate?
Portable – Works seamlessly on iPad with Apple Pencil.
Natural Feel – Realistic brushes mimic traditional drawing and painting.
Powerful Features – Layers, blending modes, and advanced effects.
Affordable – One-time purchase, no subscription needed.
Community – Huge online community offering brushes and tutorials.
2. Understanding the Workspace
Gallery – Where you manage and organize artworks.
Canvas – The digital drawing surface.
Brush Library – Includes pencils, inks, paints, and special effects.
Layers Panel – Organize artwork elements with blending and opacity settings.
Adjustments Menu – Apply effects like blur, liquify, and color balance.
3. Key Tools for Beginners
Brush Tool – Draw and paint with customizable brushes.
Smudge Tool – Blend colors and create soft transitions.
Eraser Tool – Use any brush as an eraser for creative effects.
Selection Tool – Isolate and edit specific parts of your canvas.
Transform Tool – Scale, rotate, and distort elements.
Color Picker – Tap and hold to select colors from your canvas.
4. Basic Workflow in Procreate
Create a New Canvas – Choose preset sizes or set custom dimensions.
Sketch – Use a pencil brush to draft your idea.
Inking – Refine your sketch with clean lines.
Coloring – Add base colors using brushes or color drop.
Shading – Use blending brushes or layer modes for depth.
Final Touches – Apply effects like blur, textures, or highlights.
Export Your Artwork – Save as PNG, JPEG, PSD, or even time-lapse videos.
5. Tips for Beginners
Use layers for sketching, coloring, and shading separately.
Explore blending modes for lighting and texture effects.
Customize brushes or download free ones from the Procreate community.
Learn gesture shortcuts (e.g., two-finger tap to undo).
6. Advantages of Procreate
Smooth drawing experience with Apple Pencil pressure sensitivity.
Rich brush customization options.
Time-lapse recording built in—great for sharing process videos.
Perfect balance of simplicity and professional power.
QuickShape – Perfect your shapes with one gesture.
Clipping Masks – Apply shading and textures easily.
Custom Brushes – Build your own brushes for unique styles.
Conclusion
Procreate empowers digital artists to create professional illustrations and paintings on the go. With its natural drawing feel, powerful tools, and supportive community, it’s perfect for beginners and seasoned artists alike. By learning layers, brushes, and shortcuts, you can bring your creative ideas to life with Procreate.
CorelDRAW is a powerful vector graphic design software widely used for branding, illustration, and print design. Known for its user-friendly interface and robust toolset, it’s a great choice for designers seeking an alternative to Adobe Illustrator. This guide covers the basics of CorelDRAW to help beginners start their design journey.
1. Why Use CorelDRAW?
Versatile – Suitable for logos, brochures, posters, and web graphics.
User-Friendly – Intuitive interface makes it beginner-friendly.
Vector Power – Create scalable graphics with precision.
Print-Ready – Strong features for preparing professional print projects.
Flexible Pricing – Available via one-time purchase or subscription.
2. Understanding the Workspace
Toolbox – Contains drawing, shaping, and editing tools.
Property Bar – Displays context-sensitive options for selected tools.
Docker Panels – Manage layers, colors, and object properties.
Drawing Page – The canvas where you design.
Rulers & Guidelines – Ensure precise alignment and measurements.
3. Key Tools for Beginners
Pick Tool – Select, move, and resize objects.
Shape Tool – Edit nodes and curves of vector paths.
Bezier Tool – Draw custom vector paths.
Rectangle & Ellipse Tools – Create basic shapes.
Text Tool – Add artistic or paragraph text.
Smart Fill Tool – Apply colors to specific areas.
4. Basic Workflow in CorelDRAW
Start a New Document – Choose your page size and color mode (RGB for digital, CMYK for print).
Draw Shapes – Use rectangle, ellipse, and polygon tools.
Edit Paths – Refine shapes with the Shape Tool.
Add Text – Insert titles, slogans, or paragraphs.
Apply Colors & Effects – Use the Color Palette and fills.
Arrange Objects – Use alignment tools for clean layouts.
Export Your Design – Save as PDF, PNG, or AI-compatible formats.
5. Tips for Beginners
Learn the difference between artistic text (for titles) and paragraph text (for body copy).
Use layers to organize complex projects.
Experiment with PowerClip to insert images into shapes.
Keep designs clean and simple—avoid unnecessary effects at the start.
6. Advantages of CorelDRAW
Strong support for print production.
Wide range of vector illustration tools.
Flexible file compatibility with Adobe formats.
Easier learning curve compared to some competitors.
7. Advanced Features to Explore
Mesh Fill Tool – Create realistic shading and gradients.
Typography Control – Fine-tune kerning, leading, and text effects.
CorelDRAW remains a top choice for designers who want powerful vector design capabilities with an accessible interface. Beginners can start by learning basic shapes, text tools, and color applications before moving on to advanced effects and layouts. Whether for branding, print, or digital work, CorelDRAW provides everything needed to produce professional results.
Affinity Designer has gained popularity as a professional yet affordable alternative to Adobe Illustrator. It offers powerful vector and raster design tools, making it ideal for graphic designers, illustrators, and UI/UX professionals. This guide introduces beginners to Affinity Designer and shows why it’s a strong contender in the design software market.
1. Why Choose Affinity Designer?
One-Time Purchase – No subscription fees, unlike Adobe Creative Cloud.
Dual Environment – Switch between vector and raster workspaces.
Performance – Optimized for speed and large projects.
Compatibility – Supports PSD, AI, PDF, SVG, and EPS files.
Cross-Platform – Available for Windows, macOS, and iPad.
2. The Affinity Designer Workspace
Toolbar – Contains drawing, selection, and editing tools.
Studio Panels – Manage layers, colors, brushes, and effects.
Personas – Unique feature that lets you switch between different workflows:
Designer Persona (vector design).
Pixel Persona (raster editing).
Export Persona (exporting assets).
3. Key Tools for Beginners
Pen Tool – Create vector paths and custom shapes.
Shape Tools – Rectangles, ellipses, polygons, and more.
Node Tool – Edit vector paths with precision.
Text Tool – Add and style text for typography.
Brushes – Add artistic effects in Pixel Persona.
Color Picker – Sample and apply colors easily.
4. Basic Workflow in Affinity Designer
Create a New Document – File > New. Choose your canvas size.
Draw Shapes – Start with vector shapes as your foundation.
Edit Paths – Use the Pen Tool and Node Tool for custom designs.
Switch to Pixel Persona – Add textures or paint-like effects.
Add Text – Use the Text Tool for titles, logos, or UI elements.
Export Assets – Use Export Persona for optimized outputs.
5. Advantages for Designers
No Subscription Pressure – Pay once, use forever.
Smooth Performance – Handles complex files without lag.
Seamless Workflow – Switch between vector and raster in one app.
Frequent Updates – Serif (the developer) actively improves the software.
6. Tips for Beginners
Learn Personas early—this is Affinity Designer’s biggest strength.
Use Symbols for reusable UI elements.
Explore the Assets Panel for pre-made components.
Practice switching between vector and raster workflows for hybrid designs.
7. Advanced Features to Explore
Isometric Grids – Great for game or UI design.
Custom Brushes – Build unique textures for illustrations.
Non-Destructive Adjustments – Edit without permanently changing your artwork.
Conclusion
Affinity Designer is a powerful, affordable design tool that rivals Adobe Illustrator while offering unique features like Personas. For freelancers, small studios, or anyone seeking a cost-effective solution, it’s a fantastic option for vector and raster design. By mastering the basics of tools, personas, and exports, beginners can create professional-quality designs without breaking the bank.
Canva has revolutionized design for beginners and professionals alike. As a browser-based tool, it allows anyone to create graphics, presentations, and social media posts quickly—without needing advanced design knowledge. This guide highlights key tips for making the most of Canva for quick and easy design.
1. Why Use Canva?
User-Friendly – Drag-and-drop interface with no steep learning curve.
Templates – Thousands of pre-made templates for various purposes.
Cloud-Based – Access designs from any device.
Collaboration – Share projects with teammates or clients.
Free & Pro Options – Plenty of free resources, with premium features for Pro users.
2. Understanding the Workspace
Sidebar – Contains templates, elements, text, and uploads.
Canvas – The main area where you design.
Top Menu – Adjust colors, fonts, alignment, and effects.
Brand Kit (Pro) – Save your brand colors, fonts, and logos.
3. Essential Tips for Beginners
1. Start with Templates
Choose a template as your base—perfect for social media posts, presentations, or posters.
2. Use Brand Kit
Keep your designs consistent by saving brand colors, fonts, and logos.
3. Explore Elements
Search for icons, shapes, illustrations, and photos in the Elements tab.
4. Master Text Hierarchy
Use different font sizes and weights to guide attention.
5. Utilize Grids & Frames
Easily align images and create neat photo collages.
4. Advanced Tips for Better Designs
Transparency – Adjust opacity for layered effects.
Animations – Add motion to presentations and social posts.
Magic Resize (Pro) – Instantly resize designs for different platforms.
Share Link – Allow teammates to view or edit designs.
Commenting – Clients can leave feedback directly on designs.
Folders – Keep projects organized for different clients or campaigns.
6. Exporting Designs
PNG/JPEG – For images.
PDF – For print documents.
MP4/GIF – For animated designs.
Direct Share – Post directly to social media platforms.
7. Tips for Saving Time
Create templates for recurring content (e.g., Instagram posts).
Use keyboard shortcuts (e.g., “T” for text, “R” for rectangle).
Duplicate designs instead of starting from scratch.
Conclusion
Canva is one of the easiest and fastest tools for creating professional-looking designs. By leveraging templates, brand kits, and collaboration features, designers and non-designers alike can produce stunning graphics in minutes. Whether for business, social media, or personal projects, Canva makes design accessible to everyone.
Sketch is a vector-based design tool widely used in UI/UX design, particularly for macOS users. Known for its clean interface and strong plugin ecosystem, Sketch has long been a favorite among designers creating websites, mobile apps, and digital products. This guide introduces the basics of Sketch to help beginners get started with UI design.
1. Why Choose Sketch?
UI/UX Focused – Built specifically for digital design.
Lightweight – Runs smoothly, even on older Macs.
Scalable Vectors – Perfect for designing responsive interfaces.
Plugins & Integrations – Extend functionality with thousands of plugins.
Collaboration – Works with Sketch Cloud for sharing and feedback.
2. The Sketch Workspace
Canvas – The main design area.
Inspector Panel – Displays properties like size, color, and effects.
Layers List – Organizes elements and groups.
Toolbar – Contains drawing tools, shapes, and symbols.
Pages & Artboards – Structure your project into different screens or sections.
3. Key Tools and Features
Artboards – Define screen sizes for web and mobile design.
Symbols – Reusable elements like buttons, icons, and navigation bars.
Text Styles – Maintain consistent typography across your design.
Shared Styles – Apply the same color or effect to multiple elements.
4. Basic Workflow in Sketch
Create a New Document – Start with File > New.
Add an Artboard – Choose a device preset (e.g., iPhone, Desktop).
Design UI Elements – Use shapes and text to build the interface.
Convert Elements to Symbols – Make reusable components.
Apply Styles – Ensure consistent colors and typography.
Export Assets – Save icons, images, or entire screens for developers.
5. Collaboration in Sketch
Sketch Cloud – Share files with clients and teammates for feedback.
Hand-off to Developers – Use integrations like Zeplin or Sketch Inspect for specs.
Plugins for Workflow – Extend collaboration features (e.g., real-time comments).
6. Tips for Beginners
Use grid and layout settings to maintain alignment.
Learn keyboard shortcuts to speed up design tasks.
Keep your symbols and styles organized for large projects.
Explore Sketch plugins like Craft (by InVision) to enhance productivity.
7. Advanced Features to Explore
Prototyping – Create clickable mockups directly in Sketch.
Design Systems – Build reusable libraries of symbols and styles.
Responsive Resizing – Make elements adapt to different screen sizes.
Conclusion
Sketch remains a powerful tool for UI/UX designers, particularly those working on macOS. With its focus on digital design, symbols, and strong plugin ecosystem, it simplifies the creation of responsive, scalable interfaces. By learning the basics of artboards, symbols, and styles, beginners can quickly start designing professional user interfaces with Sketch.
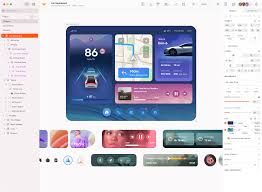
Figma has quickly become one of the most popular tools for UI/UX designers. Unlike traditional desktop design software, Figma is cloud-based, allowing real-time collaboration between team members. Whether you’re designing websites, mobile apps, or prototypes, Figma makes the process efficient and accessible.
1. Why Use Figma?
Cloud-Based – No need to install heavy software; works in your browser.
Real-Time Collaboration – Similar to Google Docs, multiple designers can edit together.
Cross-Platform – Works on Windows, Mac, Linux, and even mobile.
Free Plan – Offers powerful features at no cost, perfect for beginners.
2. Understanding the Workspace
Canvas – The main area where you design.
Layers Panel – Organizes frames, groups, and objects.
Toolbar – Contains tools for frames, shapes, text, and pen.
Properties Panel – Adjusts settings like size, color, and alignment.
Assets Panel – Stores reusable components and styles.
Shape Tools (R, O) – Build rectangles, circles, and other basic shapes.
Pen Tool (P) – Create custom paths and vector shapes.
Text Tool (T) – Add and edit typography.
Components – Reusable design elements (e.g., buttons, nav bars).
Constraints – Control how elements behave when resizing.
4. Basic Workflow for UI Design
Create a Frame – Select a screen size (desktop, iPhone, Android).
Add Layout Grids – Helps align content and maintain consistency.
Design UI Elements – Use shapes, text, and images.
Create Components – Turn repeated elements (buttons, icons) into components.
Apply Styles – Set consistent colors, text styles, and spacing.
Prototype – Link frames with interactive flows.
Share & Collaborate – Invite clients or teammates to view or edit.
5. Collaboration Features
Comments – Stakeholders can leave feedback directly on designs.
Version History – Access previous versions of your file anytime.
Plugins – Extend functionality with tools for icons, stock photos, and charts.
6. Tips for Beginners
Start with free UI kits available in the community.
Use auto layout for responsive, flexible components.
Learn keyboard shortcuts to speed up your workflow.
Organize layers with clear names and groupings.
7. Advanced Features to Explore
Design Systems – Build a library of components and styles for team consistency.
Interactive Components – Create reusable buttons with hover states.
FigJam – A whiteboard tool for brainstorming and wireframing.
Conclusion
Figma is a game-changer for UI/UX designers, offering powerful tools for design and collaboration in one platform. By learning frames, components, and prototyping, beginners can quickly create professional user interfaces and share them with clients or teammates. With practice, Figma can become the central hub for all your design projects.